Skip to content

Linux

šŸŽµ The Secret Soundtrack of GRUB: Making Your Bootloader Sing

So, you know that feeling when you’re editing GRUB for the thousandth time, because dual-booting is apparently a lifestyle choice?
In a previous post — Resurrecting My Windows Partition After 4 Years šŸ–„ļøšŸŽ® — I was neck-deep in grub.cfg, poking at boot entries, fixing UUIDs, and generally performing a ritual worthy of system resurrection.

While I was at it, I decided to take a closer look at all those mysterious variables lurking in /etc/default/grub.
That’s when I stumbled upon something… magical. ✨


šŸŽ¶ GRUB_INIT_TUNE — Your Bootloader Has a Voice

Hidden among all the serious-sounding options like GRUB_TIMEOUT and GRUB_CMDLINE_LINUX_DEFAULT sits this gem:

# Uncomment to get a beep at grub start
#GRUB_INIT_TUNE="480 440 1"

Wait, what? GRUB can beep?
Oh, not just beep. GRUB can play a tune. šŸŽŗ

Here’s how it actually works (per the GRUB manpage):

Format:

tempo freq duration [freq duration freq duration ...]
  • tempo — The base time for all note durations, in beats per minute.
    • 60 BPM → 1 second per beat
    • 120 BPM → 0.5 seconds per beat
  • freq — The note frequency in hertz.
    • 262 = Middle C, 0 = silence
  • duration — Measured in ā€œbarsā€ relative to the tempo.
    • With tempo 60, 1 = 1 second, 2 = 2 seconds, etc.

So 480 440 1 is basically GRUB saying ā€œHello, world!ā€ through your motherboard speaker: 0.25 seconds at 440 Hz, which is A4 in standard concert pitch as defined by ISO 16:1975.
And yes, this works even before your sound card drivers have loaded — pure, raw, BIOS-level nostalgia.


🧠 From Beep to Bop

Naturally, I couldn’t resist. One line turned into a small Python experiment, which turned into an audio preview tool, which turned into… let’s say, ā€œbootloader performance art.ā€

Want to make GRUB play a polska when your system starts?
You can. It’s just a matter of string length — and a little bit of mischief. šŸ˜

There’s technically no fixed ā€œmaximum sizeā€ for GRUB_INIT_TUNE, but remember: the bootloader runs in a very limited environment. Push it too far, and your majestic overture becomes a segmentation fault sonata.

So maybe keep it under a few kilobytes unless you enjoy debugging hex dumps at 2 AM.


šŸŽ¼ How to Write a Tune That Won’t Make Your Laptop Cry

Practical rules of thumb (don’t be that person):

  • Keep the inline tune under a few kilobytes if you want it to behave predictably.
  • Hundreds to a few thousands of notes is usually fine; tens of thousands is pushing luck.
  • Each numeric value (pitch or duration) must be ≤ 65535.
  • Very long tunes simply delay the menu — that’s obnoxious for you and terrifying for anyone asking you for help.
    Keep tunes short and tasteful (or obnoxious on purpose).

šŸŽµ Little Musical Grammar: Notes, Durations and Chords (Fake Ones)

Write notes as frequency numbers (Hz). Example: A4 = 440.

Prefer readable helpers: write a tiny script that converts D4 F#4 A4 into the numbers.

Example minimal tune:

GRUB_INIT_TUNE="480 294 1 370 1 440 1 370 1 392 1 494 1 294 1"

That’ll give you a jaunty, bouncy opener — suitable for mild neighbour complaints. šŸ’ƒšŸŽ»

Chords? GRUB can’t play them simultaneously — but you can fake them by rapid time-multiplexing (cycling the chord notes quickly).
It sounds like a buzzing organ, not a symphony, but it’s delightful in small doses.

Fun fact šŸ’¾: this time-multiplexing trick isn’t new — it’s straight out of the 8-bit video game era.
Old sound chips (like those in the Commodore 64 and NES) used the same sleight of hand to make
a single channel pretend to play multiple notes at once.
If you’ve ever heard a chiptune shimmer with impossible harmonies, that’s the same magic. āœØšŸŽ®


🧰 Tools I Like (and That You Secretly Want)

If you’re not into manually counting numbers, do this:

Use a small composer script (I wrote one) that:

  • Accepts melodic notation like D4 F#4 A4 or C4+E4+G4 (chord syntax).
  • Can preview via your system audio (so you don’t have to reboot to hear it).
  • Can install the result into /etc/default/grub and run update-grub (only as sudo).

Preview before you install. Always.
Your ears will tell you if your ā€œode to systemdā€ is charming or actually offensive.

For chords, the script time-multiplexes: e.g. for a 500 ms chord and 15 ms slices,
it cycles the chord notes quickly so the ear blends them.
It’s not true polyphony, but it’s a fun trick.

(If you want the full script I iterated on: drop me a comment. But it’s more fun to leave as an exercise to the reader.)


🧮 Limits, Memory, and ā€œHow Big Before It Breaks?ā€

Yes, my Red Team colleague will love this paragraph — and no, I’m not going to hand over a checklist for breaking things.

Short answer: GRUB doesn’t advertise a single fixed limit for GRUB_INIT_TUNE length.

Longer answer, responsibly phrased:

  • Numeric limits: per note pitch/duration ≤ 65535 (uint16_t).
  • Tempo: can go up to uint32_t.
  • Parser & memory: the tune is tokenized at boot, so parsing buffers and allocators impose practical limits.
    Expect a few kilobytes to be safe; hundreds of kilobytes is where things get flaky.
  • Usability: if your tune is measured in minutes, you’ve already lost. Don’t be that.

If you want to test where the parser chokes, do it in a disposable VM, never on production hardware.
If you’re feeling brave, you can even audit the GRUB source for buffer sizes in your specific version. 🧩


āš™ļø How to Make It Sing

Edit /etc/default/grub and add a line like this:

GRUB_INIT_TUNE="480 440 1 494 1 523 1  587 1  659 3"

Then rebuild your config:

sudo update-grub

Reboot, and bask in the glory of your new startup sound.
Your BIOS will literally play you in. šŸŽ¶


šŸ’” Final Thoughts

GRUB_INIT_TUNE is the operating-system equivalent of a ringtone for your toaster:
ridiculously low fidelity, disproportionately satisfying,
and a perfect tiny place to inject personality into an otherwise beige boot.

Use it for a smile, not for sabotage.

And just when I thought I’d been all clever reverse-engineering GRUB beeps myself…
I discovered that someone already built a web-based GRUB tune tester!
šŸ‘‰ https://breadmaker.github.io/grub-tune-tester/

Yes, you can compose and preview tunes right in your browser —
no need to sacrifice your system to the gods of early boot audio.
It’s surprisingly slick.

Even better, there’s a small but lively community posting their GRUB masterpieces on Reddit and other forums.
From Mario theme beeps to Doom startup riffs, there’s something both geeky and glorious about it.
You’ll find everything from tasteful minimalist dings to full-on ā€œsomeone please stop themā€ anthems. šŸŽ®šŸŽ¶

Boot loud, boot proud — but please boot considerate. šŸ˜„šŸŽ»šŸ’»

Resurrecting My Windows Partition After 4 Years šŸ–„ļøšŸŽ®

Sometimes Linux life is bliss. I have my terminal, my editor, my tools, and Steam games that run natively. For nearly four years, I didn’t touch Windows once — and I didn’t miss it.

And then Fortnite happened.

My girlfriend Enya and her wife Kyra got hooked, and naturally I wanted to join them. But Fortnite refuses to run on Linux — apparently some copy-protection magic that digs into the Windows kernel, according to Reddit (so I don’t know if it’s true). It’s rare these days for a game to be Windows-only, but rare enough to shatter my Linux-only bubble. Suddenly, resurrecting Windows wasn’t a chore anymore; it was a quest for polyamorous Battle Royale glory. šŸ•¹ļø

My Windows 11 partition had been hibernating since November 2021, quietly gathering dust and updates in a forgotten corner of the disk. Why it stopped working back then? I honestly don’t remember, but apparently I had blogged about it. I hadn’t cared — until now.


The Awakening – Peeking Into the UEFI Abyss 🐧

I started my journey with my usual tools: efibootmgr and update-grub on Ubuntu. I wanted to see what the firmware thought was bootable:

sudo efibootmgr

Output:

BootCurrent: 0001
Timeout: 1 seconds
BootOrder: 0001,0000
Boot0000* Windows Boot Manager ...
Boot0001* Ubuntu ...

At first glance, everything seemed fine. Ubuntu booted as usual. Windows… did not. It didn’t even show up in the GRUB boot menu. A little disappointing—but not unexpected, given that it hadn’t been touched in years. 😬

I knew the firmware knew about Windows—but the OS itself refused to wake up.


The Hidden Enemy – Why os-prober Was Disabled āš™ļø

I soon learned that recent Ubuntu versions disable os-prober by default. This is partly to speed up boot and partly to avoid probing unknown partitions automatically, which could theoretically be a security risk.

I re-enabled it in /etc/default/grub:

GRUB_DISABLE_OS_PROBER=false

Then ran:

sudo update-grub

Even after this tweak, Windows still didn’t appear in the GRUB menu.


The Manual Attempt – GRUB to the Rescue āœļø

Determined, I added a manual GRUB entry in /etc/grub.d/40_custom:

menuentry "Windows" {
    insmod part_gpt
    insmod fat
    insmod chain
    search --no-floppy --fs-uuid --set=root 99C1-B96E
    chainloader /EFI/Microsoft/Boot/bootmgfw.efi
}

How I found the EFI partition UUID:

sudo blkid | grep EFI

Result: UUID="99C1-B96E"

Ran sudo update-grub… Windows showed up in GRUB! But clicking it? Nothing.

At this stage, Windows still wouldn’t boot. The ghost remained untouchable.


The Missing File – Hunt for bootmgfw.efi šŸ—‚ļø

The culprit? bootmgfw.efi itself was gone. My chainloader had nothing to point to.

I mounted the NTFS Windows partition (at /home/amedee/windows) and searched for the missing EFI file:

sudo find /home/amedee/windows/ -type f -name "bootmgfw.efi"
/home/amedee/windows/Windows/Boot/EFI/bootmgfw.efi

The EFI file was hidden away, but thankfully intact. I copied it into the proper EFI directory:

sudo cp /home/amedee/windows/Windows/Boot/EFI/bootmgfw.efi /boot/efi/EFI/Microsoft/Boot/

After a final sudo update-grub, Windows appeared automatically in the GRUB menu. Finally, clicking the entry actually booted Windows. Victory! 🄳


Four Years of Sleeping Giants šŸ•°ļø

Booting Windows after four years was like opening a time capsule. I was greeted with thousands of updates, drivers, software installations, and of course, the installation of Fortnite itself. It took hours, but it was worth it. The old system came back to life.

Every ā€œupdate completeā€ message was a heartbeat closer to joining Enya and Kyra in the Battle Royale.


The GRUB Disappearance – Enter Ventoy šŸ”§

After celebrating Windows resurrection, I rebooted… and panic struck.

The GRUB menu had vanished. My system booted straight into Windows, leaving me without access to Linux. How could I escape?

I grabbed my trusty Ventoy USB stick (the same one I had used for performance tests months ago) and booted it in UEFI mode. Once in the live environment, I inspected the boot entries:

sudo efibootmgr -v

Output:

BootCurrent: 0002
Timeout: 1 seconds
BootOrder: 0002,0000,0001
Boot0000* Windows Boot Manager ...
Boot0001* Ubuntu ...
Boot0002* USB Ventoy ...

To restore Ubuntu to the top of the boot order:

sudo efibootmgr -o 0001,0000

Console output:

BootOrder changed from 0002,0000,0001 to 0001,0000

After rebooting, the GRUB menu reappeared, listing both Ubuntu and Windows. I could finally choose my OS again without further fiddling. šŸ’Ŗ


A Word on Secure Boot and Signed Kernels šŸ”

Since we’re talking bootloaders: Secure Boot only allows EFI binaries signed with a trusted key to execute. Ubuntu Desktop ships with signed kernels and a signed shim so it boots fine out of the box. If you build your own kernel or use unsigned modules, you’ll either need to sign them yourself or disable Secure Boot in firmware.


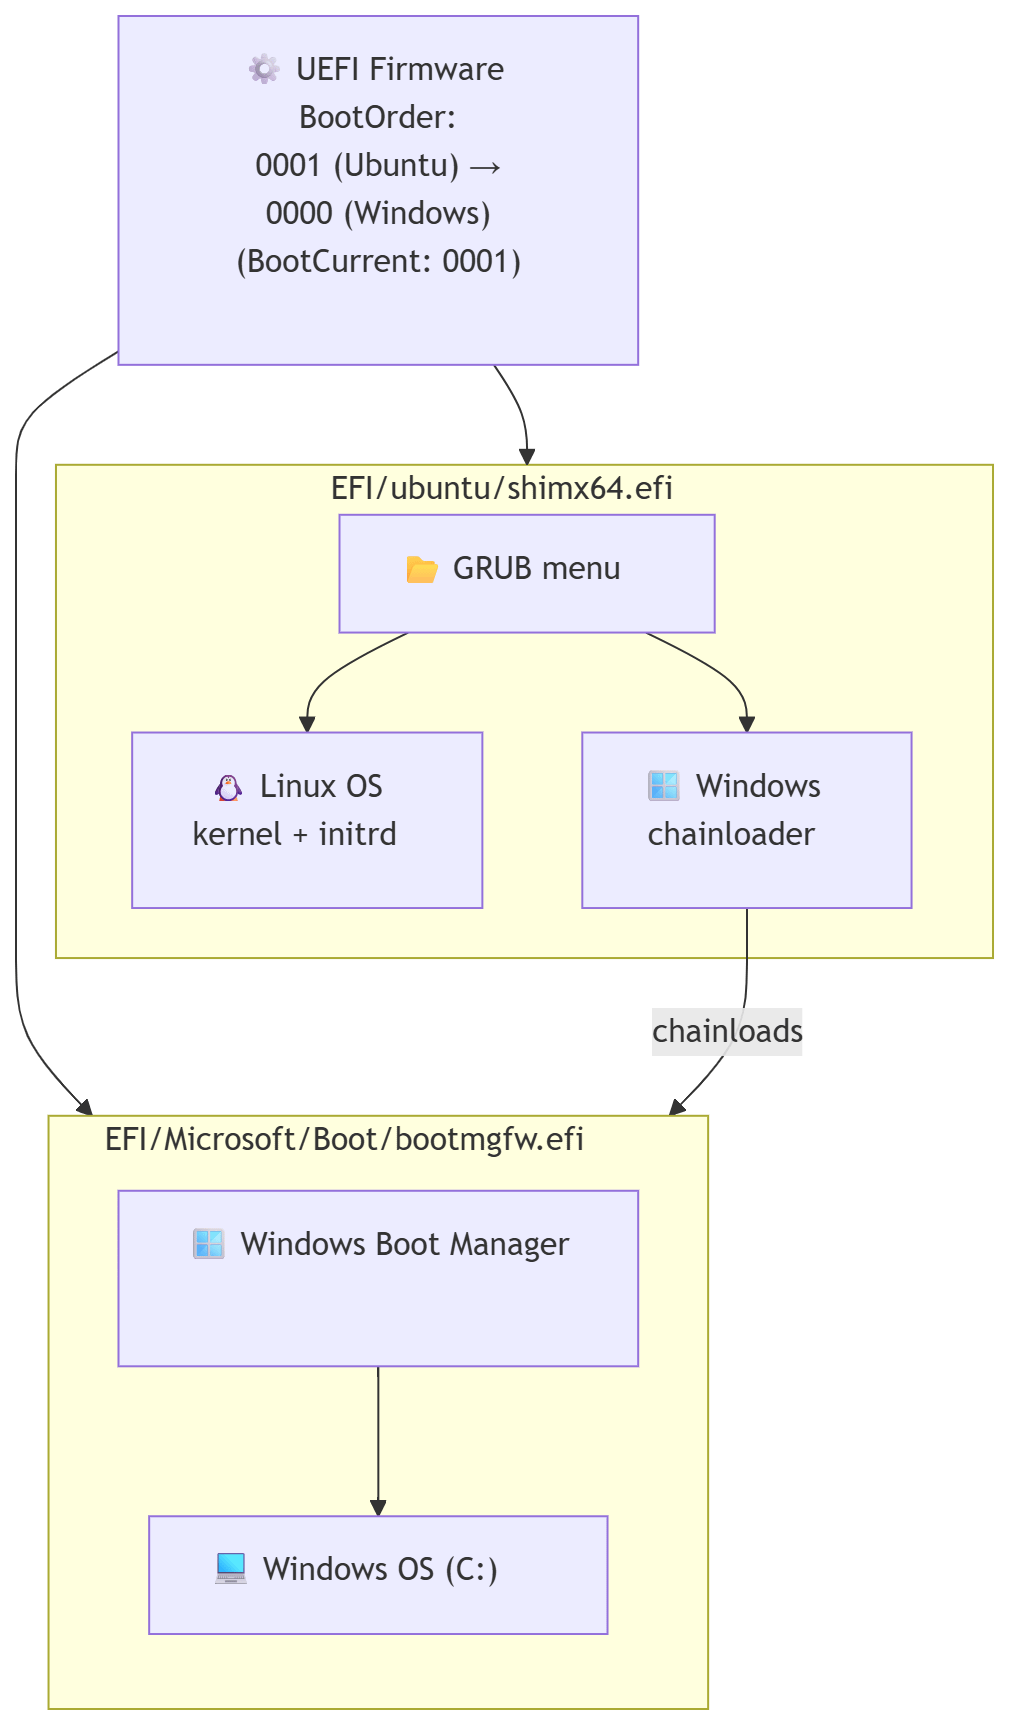
Diagram of the Boot Flow šŸ–¼ļø

Here’s a visual representation of the boot process after the fix:

flowchart TD
    UEFI["āš™ļø UEFI Firmware BootOrder:<br/>0001 (Ubuntu) →<br/>0000 (Windows)<br/>(BootCurrent: 0001)"]

    subgraph UbuntuEFI["shimx64.efi"]
        GRUB["šŸ“‚ GRUB menu"]
        LINUX["🐧 Ubuntu Linux<br/>kernel + initrd"]
        CHAINLOAD["🪟 Windows<br/>bootmgfw.efi"]
    end

    subgraph WindowsEFI["bootmgfw.efi"]
        WBM["🪟 Windows Boot Manager"]
        WINOS["šŸ’» Windows 11<br/>(C:)"]
    end

    UEFI --> UbuntuEFI
    GRUB -->|boots| LINUX
    GRUB -.->|chainloads| CHAINLOAD
    UEFI --> WindowsEFI
    WBM -->|boots| WINOS

From the GRUB menu, the Windows entry chainloads bootmgfw.efi, which then points to the Windows Boot Manager, finally booting Windows itself.


First Battle Royale šŸŽ®āœØ

After all the technical drama and late-night troubleshooting, I finally joined Enya and Kyra in Fortnite.

I had never played Fortnite before, but my FPS experience (Borderlands hype, anyone?) and PUBG knowledge from Viva La Dirt League on YouTube gave me a fighting chance.

We won our first Battle Royale together! šŸ†šŸ’„ The sense of triumph was surreal—after resurrecting a four-year-old Windows partition, surviving driver hell, and finally joining the game, victory felt glorious.


TL;DR: Quick Repair Steps ⚔

  1. Enable os-prober in /etc/default/grub.
  2. If Windows isn’t detected, try a manual GRUB entry.
  3. If boot fails, copy bootmgfw.efi from the NTFS Windows partition to /boot/efi/EFI/Microsoft/Boot/.
  4. Run sudo update-grub.
  5. If GRUB disappears after booting Windows, boot a Live USB (UEFI mode) and adjust efibootmgr to set Ubuntu first.
  6. Reboot and enjoy both OSes. šŸŽ‰

This little adventure taught me more about GRUB, UEFI, and EFI files than I ever wanted to know, but it was worth it. Most importantly, I got to join my polycule in a Fortnite victory and prove that even a four-year-old Windows partition can rise again! šŸ’–šŸŽ®

šŸ“¦ Auto-growing disks in Vagrant: because 10 GB is never enough

Have you ever fired up a Vagrant VM, provisioned a project, pulled some Docker images, ran a build… and ran out of disk space halfway through? Welcome to my world. Apparently, the default disk size in Vagrant is tiny—and while you can specify a bigger virtual disk, Ubuntu won’t magically use the extra space. You need to resize the partition, the physical volume, the logical volume, and the filesystem. Every. Single. Time.

Enough of that nonsense.

šŸ›  The setup

Here’s the relevant part of my Vagrantfile:

Vagrant.configure(2) do |config|
  config.vm.box = 'boxen/ubuntu-24.04'
  config.vm.disk :disk, size: '20GB', primary: true

  config.vm.provision 'shell', path: 'resize_disk.sh'
end

This makes sure the disk is large enough and automatically resized by the resize_disk.sh script at first boot.

✨ The script

#!/bin/bash
set -euo pipefail
LOGFILE="/var/log/resize_disk.log"
exec > >(tee -a "$LOGFILE") 2>&1
echo "[$(date)] Starting disk resize process..."

REQUIRED_TOOLS=("parted" "pvresize" "lvresize" "lvdisplay" "grep" "awk")
for tool in "${REQUIRED_TOOLS[@]}"; do
  if ! command -v "$tool" &>/dev/null; then
    echo "[$(date)] ERROR: Required tool '$tool' is missing. Exiting."
    exit 1
  fi
done

# Read current and total partition size (in sectors)
parted_output=$(parted --script /dev/sda unit s print || true)
read -r PARTITION_SIZE TOTAL_SIZE < <(echo "$parted_output" | awk '
  / 3 / {part = $4}
  /^Disk \/dev\/sda:/ {total = $3}
  END {print part, total}
')

# Trim 's' suffix
PARTITION_SIZE_NUM="${PARTITION_SIZE%s}"
TOTAL_SIZE_NUM="${TOTAL_SIZE%s}"

if [[ "$PARTITION_SIZE_NUM" -lt "$TOTAL_SIZE_NUM" ]]; then
  echo "[$(date)] Resizing partition /dev/sda3..."
  parted --fix --script /dev/sda resizepart 3 100%
else
  echo "[$(date)] Partition /dev/sda3 is already at full size. Skipping."
fi

if [[ "$(pvresize --test /dev/sda3 2>&1)" != *"successfully resized"* ]]; then
  echo "[$(date)] Resizing physical volume..."
  pvresize /dev/sda3
else
  echo "[$(date)] Physical volume is already resized. Skipping."
fi

LV_SIZE=$(lvdisplay --units M /dev/ubuntu-vg/ubuntu-lv | grep "LV Size" | awk '{print $3}' | tr -d 'MiB')
PE_SIZE=$(vgdisplay --units M /dev/ubuntu-vg | grep "PE Size" | awk '{print $3}' | tr -d 'MiB')
CURRENT_LE=$(lvdisplay /dev/ubuntu-vg/ubuntu-lv | grep "Current LE" | awk '{print $3}')

USED_SPACE=$(echo "$CURRENT_LE * $PE_SIZE" | bc)
FREE_SPACE=$(echo "$LV_SIZE - $USED_SPACE" | bc)

if (($(echo "$FREE_SPACE > 0" | bc -l))); then
  echo "[$(date)] Resizing logical volume..."
  lvresize -rl +100%FREE /dev/ubuntu-vg/ubuntu-lv
else
  echo "[$(date)] Logical volume is already fully extended. Skipping."
fi

šŸ’” Highlights

  • āœ… Uses parted with --script to avoid prompts.
  • āœ… Automatically fixes GPT mismatch warnings with --fix.
  • āœ… Calculates exact available space using lvdisplay and vgdisplay, with bc for floating point math.
  • āœ… Extends the partition, PV, and LV only when needed.
  • āœ… Logs everything to /var/log/resize_disk.log.

🚨 Gotchas

  • Your disk must already use LVM. This script assumes you’re resizing /dev/ubuntu-vg/ubuntu-lv, the default for Ubuntu server installs.
  • You must use a Vagrant box that supports VirtualBox’s disk resizing—thankfully, boxen/ubuntu-24.04 does.
  • If your LVM setup is different, you’ll need to adapt device paths.

šŸ” Automation FTW

Calling this script as a provisioner means I never have to think about disk space again during development. One less yak to shave.

Feel free to steal this setup, adapt it to your team, or improve it and send me a patch. Or better yet—don’t wait until your filesystem runs out of space at 3 AM.

Safer Commands with argv in Ansible: Pros, Cons, and Real Examples

When using Ansible to automate tasks, the command module is your bread and butter for executing system commands. But did you know that there’s a safer, cleaner, and more predictable way to pass arguments? Meet argv—an alternative to writing commands as strings.

In this post, I’ll explore the pros and cons of using argv, and I’ll walk through several real-world examples tailored to web servers and mail servers.


Why Use argv Instead of a Command String?

āœ… Pros

  • Avoids Shell Parsing Issues: Each argument is passed exactly as intended, with no surprises from quoting or spaces.
  • More Secure: No shell = no risk of shell injection.
  • Clearer Syntax: Every argument is explicitly defined, improving readability.
  • Predictable: Behavior is consistent across different platforms and setups.

āŒ Cons

  • No Shell Features: You can’t use pipes (|), redirection (>), or environment variables like $HOME.
  • More Verbose: Every argument must be a separate list item. It’s explicit, but more to type.
  • Not for Shell Built-ins: Commands like cd, export, or echo with redirection won’t work.

Real-World Examples

Let’s apply this to actual use cases.

šŸ”§ Restarting Nginx with argv

- name: Restart Nginx using argv
  hosts: amedee.be
  become: yes
  tasks:
    - name: Restart Nginx
      ansible.builtin.command:
        argv:
          - systemctl
          - restart
          - nginx

šŸ“¬ Check Mail Queue on a Mail-in-a-Box Server

- name: Check Postfix mail queue using argv
  hosts: box.vangasse.eu
  become: yes
  tasks:
    - name: Get mail queue status
      ansible.builtin.command:
        argv:
          - mailq
      register: mail_queue

    - name: Show queue
      ansible.builtin.debug:
        msg: "{{ mail_queue.stdout_lines }}"

šŸ—ƒļø Back Up WordPress Database

- name: Backup WordPress database using argv
  hosts: amedee.be
  become: yes
  vars:
    db_user: wordpress_user
    db_password: wordpress_password
    db_name: wordpress_db
  tasks:
    - name: Dump database
      ansible.builtin.command:
        argv:
          - mysqldump
          - -u
          - "{{ db_user }}"
          - -p{{ db_password }}
          - "{{ db_name }}"
          - --result-file=/root/wordpress_backup.sql

āš ļø Avoid exposing credentials directly—use Ansible Vault instead.


Using argv with Interpolation

Ansible lets you use Jinja2-style variables ({{ }}) inside argv items.

šŸ”„ Restart a Dynamic Service

- name: Restart a service using argv and variable
  hosts: localhost
  become: yes
  vars:
    service_name: nginx
  tasks:
    - name: Restart
      ansible.builtin.command:
        argv:
          - systemctl
          - restart
          - "{{ service_name }}"

šŸ•’ Timestamped Backups

- name: Timestamped DB backup
  hosts: localhost
  become: yes
  vars:
    db_user: wordpress_user
    db_password: wordpress_password
    db_name: wordpress_db
  tasks:
    - name: Dump with timestamp
      ansible.builtin.command:
        argv:
          - mysqldump
          - -u
          - "{{ db_user }}"
          - -p{{ db_password }}
          - "{{ db_name }}"
          - --result-file=/root/wordpress_backup_{{ ansible_date_time.iso8601 }}.sql

🧩 Dynamic Argument Lists

Avoid join(' '), which collapses the list into a single string.

āŒ Wrong:

argv:
  - ls
  - "{{ args_list | join(' ') }}"  # BAD: becomes one long string

āœ… Correct:

argv: ["ls"] + args_list

Or if the length is known:

argv:
  - ls
  - "{{ args_list[0] }}"
  - "{{ args_list[1] }}"

šŸ“£ Interpolation Inside Strings

- name: Greet with hostname
  hosts: localhost
  tasks:
    - name: Print message
      ansible.builtin.command:
        argv:
          - echo
          - "Hello, {{ ansible_facts['hostname'] }}!"


When to Use argv

āœ… Commands with complex quoting or multiple arguments
āœ… Tasks requiring safety and predictability
āœ… Scripts or binaries that take arguments, but not full shell expressions

When to Avoid argv

āŒ When you need pipes, redirection, or shell expansion
āŒ When you’re calling shell built-ins


Final Thoughts

Using argv in Ansible may feel a bit verbose, but it offers precision and security that traditional string commands lack. When you need reliable, cross-platform automation that avoids the quirks of shell parsing, argv is the better choice.

Prefer safety? Choose argv.
Need shell magic? Use the shell module.

Have a favorite argv trick or horror story? Drop it in the comments below.

Creating 10 000 Random Files & Analyzing Their Size Distribution: Because Why Not? šŸ§šŸ’¾

Ever wondered what it’s like to unleash 10 000 tiny little data beasts on your hard drive? No? Well, buckle up anyway — because today, we’re diving into the curious world of random file generation, and then nerding out by calculating their size distribution. Spoiler alert: it’s less fun than it sounds. šŸ˜

Step 1: Let’s Make Some Files… Lots of Them

Our goal? Generate 10 000 files filled with random data. But not just any random sizes — we want a mean file size of roughly 68 KB and a median of about 2 KB. Sounds like a math puzzle? That’s because it kind of is.

If you just pick file sizes uniformly at random, you’ll end up with a median close to the mean — which is boring. We want a skewed distribution, where most files are small, but some are big enough to bring that average up.

The Magic Trick: Log-normal Distribution šŸŽ©āœØ

Enter the log-normal distribution, a nifty way to generate lots of small numbers and a few big ones — just like real life. Using Python’s NumPy library, we generate these sizes and feed them to good old /dev/urandom to fill our files with pure randomness.

Here’s the Bash script that does the heavy lifting:

#!/bin/bash

# Directory to store the random files
output_dir="random_files"
mkdir -p "$output_dir"

# Total number of files to create
file_count=10000

# Log-normal distribution parameters
mean_log=9.0  # Adjusted for ~68KB mean
stddev_log=1.5  # Adjusted for ~2KB median

# Function to generate random numbers based on log-normal distribution
generate_random_size() {
    python3 -c "import numpy as np; print(int(np.random.lognormal($mean_log, $stddev_log)))"
}

# Create files with random data
for i in $(seq 1 $file_count); do
    file_size=$(generate_random_size)
    file_path="$output_dir/file_$i.bin"
    head -c "$file_size" /dev/urandom > "$file_path"
    echo "Generated file $i with size $file_size bytes."
done

echo "Done. Files saved in $output_dir."

Easy enough, right? This creates a directory random_files and fills it with 10 000 files of sizes mostly small but occasionally wildly bigger. Don’t blame me if your disk space takes a little hit! šŸ’„

Step 2: Crunching Numbers — The File Size Distribution šŸ“Š

Okay, you’ve got the files. Now, what can we learn from their sizes? Let’s find out the:

  • Mean size: The average size across all files.
  • Median size: The middle value when sizes are sorted — because averages can lie.
  • Distribution breakdown: How many tiny files vs. giant files.

Here’s a handy Bash script that reads file sizes and spits out these stats with a bit of flair:

#!/bin/bash

# Input directory (default to "random_files" if not provided)
directory="${1:-random_files}"

# Check if directory exists
if [ ! -d "$directory" ]; then
    echo "Directory $directory does not exist."
    exit 1
fi

# Array to store file sizes
file_sizes=($(find "$directory" -type f -exec stat -c%s {} \;))

# Check if there are files in the directory
if [ ${#file_sizes[@]} -eq 0 ]; then
    echo "No files found in the directory $directory."
    exit 1
fi

# Calculate mean
total_size=0
for size in "${file_sizes[@]}"; do
    total_size=$((total_size + size))
done
mean=$((total_size / ${#file_sizes[@]}))

# Calculate median
sorted_sizes=($(printf '%s\n' "${file_sizes[@]}" | sort -n))
mid=$(( ${#sorted_sizes[@]} / 2 ))
if (( ${#sorted_sizes[@]} % 2 == 0 )); then
    median=$(( (sorted_sizes[mid-1] + sorted_sizes[mid]) / 2 ))
else
    median=${sorted_sizes[mid]}
fi

# Display file size distribution
echo "File size distribution in directory $directory:"
echo "---------------------------------------------"
echo "Number of files: ${#file_sizes[@]}"
echo "Mean size: $mean bytes"
echo "Median size: $median bytes"

# Display detailed size distribution (optional)
echo
echo "Detailed distribution (size ranges):"
awk '{
    if ($1 < 1024) bins["< 1 KB"]++;
    else if ($1 < 10240) bins["1 KB - 10 KB"]++;
    else if ($1 < 102400) bins["10 KB - 100 KB"]++;
    else bins[">= 100 KB"]++;
} END {
    for (range in bins) printf "%-15s: %d\n", range, bins[range];
}' <(printf '%s\n' "${file_sizes[@]}")

Run it, and voilĆ  — instant nerd satisfaction.

Example Output:

File size distribution in directory random_files:
---------------------------------------------
Number of files: 10000
Mean size: 68987 bytes
Median size: 2048 bytes

Detailed distribution (size ranges):
&lt; 1 KB         : 1234
1 KB - 10 KB   : 5678
10 KB - 100 KB : 2890
>= 100 KB      : 198

Why Should You Care? šŸ¤·ā€ā™€ļø

Besides the obvious geek cred, generating files like this can help:

  • Test backup systems — can they handle weird file size distributions?
  • Stress-test storage or network performance with real-world-like data.
  • Understand your data patterns if you’re building apps that deal with files.

Wrapping Up: Big Files, Small Files, and the Chaos In Between

So there you have it. Ten thousand random files later, and we’ve peeked behind the curtain to understand their size story. It’s a bit like hosting a party and then figuring out who ate how many snacks. šŸæ

Try this yourself! Tweak the distribution parameters, generate files, crunch the numbers — and impress your friends with your mad scripting skills. Or at least have a fun weekend project that makes you sound way smarter than you actually are.

Happy hacking! šŸ”„

How I Tamed Duplicity’s Buggy Versions — and Made Sure I Always Have a Backup šŸ›”ļøšŸ’¾

If you’re running Mail-in-a-Box like me, you might rely on Duplicity to handle backups quietly in the background. It’s a great tool — until it isn’t. Recently, I ran into some frustrating issues caused by buggy Duplicity versions. Here’s the story, a useful discussion from the Mail-in-a-Box forums, and a neat trick I use to keep fallback versions handy. Spoiler: it involves an APT hook and some smart file copying! šŸš€


The Problem with Duplicity Versions

Duplicity 3.0.1 and 3.0.5 have been reported to cause backup failures — a real headache when you depend on them to protect your data. The Mail-in-a-Box forum post ā€œSomething is wrong with the backupā€ dives into these issues with great detail. Users reported mysterious backup failures and eventually traced it back to specific Duplicity releases causing the problem.

Here’s the catch: those problematic versions sometimes sneak in during automatic updates. By the time you realize something’s wrong, you might already have upgraded to a buggy release. 😩


Pinning Problematic Versions with APT Preferences

One way to stop apt from installing those broken versions is to use APT pinning. Here’s an example file I created in /etc/apt/preferences/pin_duplicity.pref:

Explanation: Duplicity version 3.0.1* has a bug and should not be installed
Package: duplicity
Pin: version 3.0.1*
Pin-Priority: -1

Explanation: Duplicity version 3.0.5* has a bug and should not be installed
Package: duplicity
Pin: version 3.0.5*
Pin-Priority: -1

This tells apt to refuse to install these specific buggy versions. Sounds great, right? Except — it often comes too late. You could already have updated to a broken version before adding the pin.

Also, since Duplicity is installed from a PPA, older versions vanish quickly as new releases push them out. This makes rolling back to a known good version a pain. 😤


My Solution: Backing Up Known Good Duplicity .deb Files Automatically

To fix this, I created an APT hook that runs after every package operation involving Duplicity. It automatically copies the .deb package files of Duplicity from apt’s archive cache — and even from my local folder if I’m installing manually — into a safe backup folder.

Here’s the script, saved as /usr/local/bin/apt-backup-duplicity.sh:

#!/bin/bash
set -x

mkdir -p /var/backups/debs/duplicity

cp -vn /var/cache/apt/archives/duplicity_*.deb /var/backups/debs/duplicity/ 2>/dev/null || true
cp -vn /root/duplicity_*.deb /var/backups/debs/duplicity/ 2>/dev/null || true

And here’s the APT hook configuration I put in /etc/apt/apt.conf.d/99backup-duplicity-debs to run this script automatically after DPKG operations:

DPkg::Post-Invoke { "/usr/local/bin/apt-backup-duplicity.sh"; };

Use apt-mark hold to Lock a Working Duplicity Version šŸ”’

Even with pinning and local .deb backups, there’s one more layer of protection I recommend: freezing a known-good version with apt-mark hold.

Once you’ve confirmed that your current version of Duplicity works reliably, run:

sudo apt-mark hold duplicity

This tells apt not to upgrade Duplicity, even if a newer version becomes available. It’s a great way to avoid accidentally replacing your working setup with something buggy during routine updates.

🧠 Pro Tip: I only unhold and upgrade Duplicity manually after checking the Mail-in-a-Box forum for reports that a newer version is safe.

When you’re ready to upgrade, do this:

sudo apt-mark unhold duplicity
sudo apt update
sudo apt install duplicity

If everything still works fine, you can apt-mark hold it again to freeze the new version.


How to Use Your Backup Versions to Roll Back

If a new Duplicity version breaks your backups, you can easily reinstall a known-good .deb file from your backup folder:

sudo apt install --reinstall /var/backups/debs/duplicity/duplicity_<version>.deb

Replace <version> with the actual filename you want to roll back to. Because you saved the .deb files right after each update, you always have access to older stable versions — even if the PPA has moved on.


Final Thoughts

While pinning bad versions helps, having a local stash of known-good packages is a game changer. Add apt-mark hold on top of that, and you have a rock-solid defense against regressions. 🪨✨

It’s a small extra step but pays off hugely when things go sideways. Plus, it’s totally automated with the APT hook, so you don’t have to remember to save anything manually. šŸŽ‰

If you run Mail-in-a-Box or rely on Duplicity in any critical backup workflow, I highly recommend setting up this safety net.

Stay safe and backed up! šŸ›”ļøāœØ

🧱 Let’s Get Hard (Links): Deduplicating My Linux Filesystem with Hadori

File deduplication isn’t just for massive storage arrays or backup systems—it can be a practical tool for personal or server setups too. In this post, I’ll explain how I use hardlinking to reduce disk usage on my Linux system, which directories are safe (and unsafe) to link, why I’m OK with the trade-offs, and how I automated it with a simple monthly cron job using a neat tool called hadori.


šŸ”— What Is Hardlinking?

In a traditional filesystem, every file has an inode, which is essentially its real identity—the data on disk. A hard link is a different filename that points to the same inode. That means:

  • The file appears to exist in multiple places.
  • But there’s only one actual copy of the data.
  • Deleting one link doesn’t delete the content, unless it’s the last one.

Compare this to a symlink, which is just a pointer to a path. A hardlink is a pointer to the data.

So if you have 10 identical files scattered across the system, you can replace them with hardlinks, and boom—nine of them stop taking up extra space.


šŸ¤” Why Use Hardlinking?

My servers run a fairly standard Ubuntu install, and like most Linux machines, the root filesystem accumulates a lot of identical binaries and libraries—especially across /bin, /lib, /usr, and /opt.

That’s not a problem… until you’re tight on disk space, or you’re just a curious nerd who enjoys squeezing every last byte.

In my case, I wanted to reduce disk usage safely, without weird side effects.

Hardlinking is a one-time cost with ongoing benefits. It’s not compression. It’s not archival. But it’s efficient and non-invasive.


šŸ“ Which Directories Are Safe to Hardlink?

Hardlinking only works within the same filesystem, and not all directories are good candidates.

āœ… Safe directories:

  • /bin, /sbin – system binaries
  • /lib, /lib64 – shared libraries
  • /usr, /usr/bin, /usr/lib, /usr/share, /usr/local – user-space binaries, docs, etc.
  • /opt – optional manually installed software

These contain mostly static files: compiled binaries, libraries, man pages… not something that changes often.

āš ļø Unsafe or risky directories:

  • /etc – configuration files, might change frequently
  • /var, /tmp – logs, spools, caches, session data
  • /home – user files, temporary edits, live data
  • /dev, /proc, /sys – virtual filesystems, do not touch

If a file is modified after being hardlinked, it breaks the deduplication (the OS creates a copy-on-write scenario), and you’re back where you started—or worse, sharing data you didn’t mean to.

That’s why I avoid any folders with volatile, user-specific, or auto-generated files.


🧨 Risks and Limitations

Hardlinking is not magic. It comes with sharp edges:

  • One inode, multiple names: All links are equal. Editing one changes the data for all.
  • Backups: Some backup tools don’t preserve hardlinks or treat them inefficiently.
    āž¤ Duplicity, which I use, does not preserve hardlinks. It backs up each linked file as a full copy, so hardlinking won’t reduce backup size.
  • Security: Linking files with different permissions or owners can have unexpected results.
  • Limited scope: Only works within the same filesystem (e.g., can’t link / and /mnt if they’re on separate partitions).

In my setup, I accept those risks because:

  • I’m only linking read-only system files.
  • I never link config or user data.
  • I don’t rely on hardlink preservation in backups.
  • I test changes before deploying.

In short: I know what I’m linking, and why.


šŸ” What the Critics Say About Hardlinking

Not everyone loves hardlinks—and for good reasons. Two thoughtful critiques are:

The core arguments:

  • Hardlinks violate expectations about file ownership and identity.
  • They can break assumptions in software that tracks files by name or path.
  • They complicate file deletion logic—deleting one name doesn’t delete the content.
  • They confuse file monitoring and logging tools, since it’s hard to tell if a file is “new” or just another name.
  • They increase the risk of data corruption if accidentally modified in-place by a script that assumes it owns the file.

Why I’m still OK with it:

These concerns are valid—but mostly apply to:

  • Mutable files (e.g., logs, configs, user data)
  • Systems with untrusted users or dynamic scripts
  • Software that relies on inode isolation or path integrity

In contrast, my approach is intentionally narrow and safe:

  • I only deduplicate read-only system files in /bin, /sbin, /lib, /lib64, /usr, and /opt.
  • These are owned by root, and only changed during package updates.
  • I don’t hardlink anything under /home, /etc, /var, or /tmp.
  • I know exactly when the cron job runs and what it targets.

So yes, hardlinks can be dangerous—but only if you use them in the wrong places. In this case, I believe I’m using them correctly and conservatively.


⚔ Does Hardlinking Impact System Performance?

Good news: hardlinks have virtually no impact on system performance in everyday use.

Hardlinks are a native feature of Linux filesystems like ext4 or xfs. The OS treats a hardlinked file just like a normal file:

  • Reading and writing hardlinked files is just as fast as normal files.
  • Permissions, ownership, and access behave identically.
  • Common tools (ls, cat, cp) don’t care whether a file is hardlinked or not.
  • Filesystem caches and memory management work exactly the same.

The only difference is that multiple filenames point to the exact same data.

Things to keep in mind:

  • If you edit a hardlinked file, all links see that change because there’s really just one file.
  • Some tools (backup, disk usage) might treat hardlinked files differently.
  • Debugging or auditing files can be slightly trickier since multiple paths share one inode.

But from a performance standpoint? Your system won’t even notice the difference.


šŸ› ļø Tools for Hardlinking

There are a few tools out there:

  • fdupes – finds duplicates and optionally replaces with hardlinks
  • rdfind – more sophisticated detection
  • hardlink – simple but limited
  • jdupes – high-performance fork of fdupes

šŸ“Œ About Hadori

From the Debian package description:

This might look like yet another hardlinking tool, but it is the only one which only memorizes one filename per inode. That results in less memory consumption and faster execution compared to its alternatives. Therefore (and because all the other names are already taken) it’s called “Hardlinking DOne RIght”.

Advantages over other tools:

  • Predictability: arguments are scanned in order, each first version is kept
  • Much lower CPU and memory consumption compared to alternatives

This makes hadori especially suited for system-wide deduplication where efficiency and reliability matter.


ā±ļø How I Use Hadori

I run hadori once per month with a cron job. Here’s the actual command:

/usr/bin/hadori --verbose /bin /sbin /lib /lib64 /usr /opt

This scans those directories, finds duplicate files, and replaces them with hardlinks when safe.

And here’s the crontab entry I installed in the file /etc/cron.d/hadori:

@monthly root /usr/bin/hadori --verbose /bin /sbin /lib /lib64 /usr /opt

šŸ“‰ What Are the Results?

After the first run, I saw a noticeable reduction in used disk space, especially in /usr/lib and /usr/share. On my modest VPS, that translated to about 300–500 MB saved—not huge, but non-trivial for a small root partition.

While this doesn’t reduce my backup size (Duplicity doesn’t support hardlinks), it still helps with local disk usage and keeps things a little tidier.

And because the job only runs monthly, it’s not intrusive or performance-heavy.


🧼 Final Thoughts

Hardlinking isn’t something most people need to think about. And frankly, most people probably shouldn’t use it.

But if you:

  • Know what you’re linking
  • Limit it to static, read-only system files
  • Automate it safely and sparingly

…then it can be a smart little optimization.

With a tool like hadori, it’s safe, fast, and efficient. I’ve read the horror stories—and decided that in my case, they don’t apply.


āœ‰ļø This post was brought to you by a monthly cron job and the letters i-n-o-d-e.

šŸ¤” ā€œWasn’t /dev/null Good Enough?ā€ — Understanding the Difference Between /dev/null and /dev/zero

After my last blog post about the gloriously pointless /dev/scream, a few people asked:

ā€œWasn’t /dev/null good enough?ā€

Fair question—but it misses a key point.

Let me explain: /dev/null and /dev/zero are not interchangeable. In fact, they are opposites in many ways. And to fully appreciate the joke behind /dev/scream, you need to understand where that scream is coming from—not where it ends up.


🌌 Black Holes and White Holes

To understand the difference, let us borrow a metaphor from cosmology.

  • /dev/null is like a black hole: it swallows everything. You can write data to it, but nothing ever comes out. Not even light. Not even your logs.
  • /dev/zero is like a white hole: it constantly emits data. In this case, an infinite stream of zero bytes (0x00). It produces, but does not accept.

So when I run:

dd if=/dev/zero of=/dev/null

I am pulling data out of the white hole, and sending it straight into the black hole. A perfectly balanced operation of cosmic futility.


šŸ“¦ What Are All These /dev/* Devices?

Let us break down the core players:

DeviceCan You Write To It?Can You Read From It?What You ReadCommonly Used ForNickname / Metaphor
/dev/nullYesYesInstantly empty (EOF)Discard console output of a programBlack hole šŸŒ‘
/dev/zeroYesYesEndless zeroes (0x00)Wiping drives, filling files, or allocating memory with known contentsWhite hole šŸŒ•
/dev/randomNoYesRandom bytes from entropy poolSecure wiping drives, generating random dataQuantum noise šŸŽ²
/dev/urandomNoYesPseudo-random bytes (faster, less secure)Generating random dataPseudo-random fountain šŸ”€
/dev/oneYesYesEndless 0xFF bytesWiping drives, filling files, or allocating memory with known contentsThe dark mirror of /dev/zero ā˜ ļø
/dev/screamYesYesaHAAhhaHHAAHaAaAAAA…CatharsisEmotional white hole 😱

Note: /dev/one is not a standard part of Linux—it comes from a community kernel module, much like /dev/scream.


šŸ—£ļø Back to the Screaming

/dev/scream is a parody of /dev/zero—not /dev/null.

The point of /dev/scream was not to discard data. That is what /dev/null is for.

The point was to generate data, like /dev/zero or /dev/random, but instead of silent zeroes or cryptographic entropy, it gives you something more cathartic: an endless, chaotic scream.

aHAAhhaHHAAHaAaAAAAhhHhhAAaAAAhAaaAAAaHHAHhAaaaaAaHahAaAHaAAHaaHhAHhHaHaAaHAAHaAhhaHaAaAA

So when I wrote:

dd if=/dev/scream of=/dev/null

I was screaming into the void. The scream came from the custom device, and /dev/null politely absorbed it without complaint. Not a single bit screamed back. Like pulling screams out of a white hole and throwing them into a black hole. The ultimate cosmic catharsis.


🧪 Try Them Yourself

Want to experience the universe of /dev for yourself? Try these commands (press Ctrl+C to stop each):

# Silent, empty. Nothing comes out.
cat /dev/null

# Zero bytes forever. Very chill.
hexdump -C /dev/zero

# Random bytes from real entropy (may block).
hexdump -C /dev/random

# Random bytes, fast but less secure.
hexdump -C /dev/urandom

# If you have the /dev/one module:
hexdump -C /dev/one

# If you installed /dev/scream:
cat /dev/scream

šŸ’” TL;DR

  • /dev/null = Black hole: absorbs, never emits.
  • /dev/zero = White hole: emits zeroes, absorbs nothing.
  • /dev/random / /dev/urandom = Entropy sources: useful for cryptography.
  • /dev/one = Evil twin of /dev/zero: gives endless 0xFF bytes.
  • /dev/scream = Chaotic white hole: emits pure emotional entropy.

So no, /dev/null was not ā€œgood enoughā€ā€”it was not the right tool. The original post was not about where the data goes (of=/dev/null), but where it comes from (if=/dev/scream), just like /dev/zero. And when it comes from /dev/scream, you are tapping into something truly primal.

Because sometimes, in Linux as in life, you just need to scream into the void.

🐧 Falling Down the /dev Rabbit Hole: From Secure Deletion to /dev/scream

It started innocently enough. I was reading a thread about secure file deletion on Linux—a topic that has popped up in discussions for decades. You know the kind: “Is shred still reliable? Should I overwrite with random data or zeroes? What about SSDs and wear leveling?”

As I followed the thread, I came across a mention of /dev/zero, the classic Unix device that outputs an endless stream of null bytes (0x00). It is often used in scripts and system maintenance tasks like wiping partitions or creating empty files.

That led me to wonder: if there is /dev/zero, is there a /dev/one?

Turns out, not in the standard kernel—but someone did write a kernel module to simulate it. It outputs a continuous stream of 0xFF, which is essentially all bits set to one. It is a fun curiosity with some practical uses in testing or wiping data in a different pattern.

But then came the real gem of the rabbit hole: /dev/scream.

Yes, it is exactly what it sounds like.

What is /dev/scream?

/dev/scream is a Linux kernel module that creates a character device which, when read, outputs a stream of text that mimics a chaotic, high-pitched scream. Think:

aHAAhhaHHAAHaAaAAAAhhHhhAAaAAAhAaaAAAaHHAHhAaaaaAaHahAaAHaAAHaaHhAHhHaHaAaHAAHaAhhaHaAaAA

It is completely useless… and completely delightful.

Originally written by @matlink, the module is a humorous take on the Unix philosophy: “Everything is a file”—even your existential dread. It turns your terminal into a primal outlet. Just run:

cat /dev/scream

And enjoy the textual equivalent of a scream into the void.

Why?

Why not?

Sometimes the joy of Linux is not about solving problems, but about exploring the weird and wonderful corners of its ecosystem. From /dev/null swallowing your output silently, to /dev/urandom serving up chaos, to /dev/scream venting it—all of these illustrate the creativity of the open source world.

Sure, shred and secure deletion are important. But so is remembering that your system is a playground.

Try it Yourself

If you want to give /dev/scream a go, here is how to install it:

āš ļø Warning

This is a custom kernel module. It is not dangerous, but do not run it on production systems unless you know what you are doing.

Build and Load the Module

git clone https://github.com/matlink/dev_scream.git
cd dev_scream
make build
sudo make install
sudo make load
sudo insmod dev_scream.ko

Now read from the device:

cat /dev/scream

Or, if you are feeling truly poetic, try screaming into the void:

dd if=/dev/scream of=/dev/null

In space, nobody can hear you scream… but on Linux, /dev/scream is loud and clear—even if you pipe it straight into oblivion.

When you are done screaming:

sudo rmmod dev_scream

Final Thoughts

I started with secure deletion, and I ended up installing a kernel module that screams. This is the beauty of curiosity-driven learning in Linux: you never quite know where you will end up. And sometimes, after a long day, maybe all you need is to cat /dev/scream.

Let me know if you tried it—and whether your terminal feels a little lighter afterward.

Automating My Server Management with Ansible and GitHub Actions

Managing multiple servers can be a daunting task, especially when striving for consistency and efficiency. To tackle this challenge, I developed a robust automation system using Ansible, GitHub Actions, and Vagrant. This setup not only streamlines server configuration but also ensures that deployments are repeatable and maintainable.

A Bit of History: How It All Started

This project began out of necessity. I was maintaining a handful of Ubuntu servers — one for email, another for a website, and a few for experiments — and I quickly realized that logging into each one to make manual changes was both tedious and error-prone. My first step toward automation was a collection of shell scripts. They worked, but as the infrastructure grew, they became hard to manage and lacked the modularity I needed.

That is when I discovered Ansible. I created the ansible-servers repository in early 2024 as a way to centralize and standardize my infrastructure automation. Initially, it only contained a basic playbook for setting up users and updating packages. But over time, it evolved to include multiple roles, structured inventories, and eventually CI/CD integration through GitHub Actions.

Every addition was born out of a real-world need. When I got tired of testing changes manually, I added Vagrant to simulate my environments locally. When I wanted to be sure my configurations stayed consistent after every push, I integrated GitHub Actions to automate deployments. When I noticed the repo growing, I introduced linting and security checks to maintain quality.

The repository has grown steadily and organically, each commit reflecting a small lesson learned or a new challenge overcome.

The Foundation: Ansible Playbooks

At the core of my automation strategy are Ansible playbooks, which define the desired state of my servers. These playbooks handle tasks such as installing necessary packages, configuring services, and setting up user accounts. By codifying these configurations, I can apply them consistently across different environments.

To manage these playbooks, I maintain a structured repository that includes:

  • Inventory Files: Located in the inventory directory, these YAML files specify the hosts and groups for deployment targets.
  • Roles: Under the roles directory, I define reusable components that encapsulate specific functionalities, such as setting up a web server or configuring a database.
  • Configuration File: The ansible.cfg file sets important defaults, like enabling fact caching and specifying the inventory path, to optimize Ansible’s behavior.

Seamless Deployments with GitHub Actions

To automate the deployment process, I leverage GitHub Actions. This integration allows me to trigger Ansible playbooks automatically upon code changes, ensuring that my servers are always up-to-date with the latest configurations.

One of the key workflows is Deploy to Production, which executes the main playbook against the production inventory. This workflow is defined in the ansible-deploy.yml file and is triggered on specific events, such as pushes to the main branch.

Additionally, I have set up other workflows to maintain code quality and security:

  • Super-Linter: Automatically checks the codebase for syntax errors and adherence to best practices.
  • Codacy Security Scan: Analyzes the code for potential security vulnerabilities.
  • Dependabot Updates: Keeps dependencies up-to-date by automatically creating pull requests for new versions.

Local Testing with Vagrant

Before deploying changes to production, it is crucial to test them in a controlled environment. For this purpose, I use Vagrant to spin up virtual machines that mirror my production servers.

The deploy_to_staging.sh script automates this process by:

  1. Starting the Vagrant environment and provisioning it.
  2. Installing required Ansible roles specified in requirements.yml.
  3. Running the Ansible playbook against the staging inventory.

This approach allows me to validate changes in a safe environment before applying them to live servers.

Embracing Open Source and Continuous Improvement

Transparency and collaboration are vital in the open-source community. By hosting my automation setup on GitHub, I invite others to review, suggest improvements, and adapt the configurations for their own use cases.

The repository is licensed under the MIT License, encouraging reuse and modification. Moreover, I actively monitor issues and welcome contributions to enhance the system further.


In summary, by combining Ansible, GitHub Actions, and Vagrant, I have created a powerful and flexible automation framework for managing my servers. This setup not only reduces manual effort but also increases reliability and scalability. I encourage others to explore this approach and adapt it to their own infrastructure needs. What began as a few basic scripts has now evolved into a reliable automation pipeline I rely on every day.

If you are managing servers and find yourself repeating the same configuration steps, I invite you to check out the ansible-servers repository on GitHub. Clone it, explore the structure, try it in your own environment — and if you have ideas or improvements, feel free to open a pull request or start a discussion. Automation has made a huge difference for me, and I hope it can do the same for you.