I removed the Node.js component from my configuration management repository yesterday.
Not because of some grand redesign. I deleted a reusable GitHub Action, and then realized it was the only reason Node.js was still hanging around.
The repository is Ansible, YAML, shell scripts, and a bit of Python. No JavaScript. No TypeScript. Yet somehow I was still carrying a Node.js toolchain, npm dependencies, and CI jobs that no longer served a purpose.
So out they went.
As a bonus, I also retired an old ESLint workflow. No JavaScript means no need to lint JavaScript.
Simple.
I’ll admit I’ve never been a fan of dependency-heavy ecosystems. If I actually need the functionality, that’s fine. But if a dependency tree exists purely because of historical baggage, I’d rather remove it than maintain it.
The result?
One less runtime
One less workflow
Fewer dependencies
Less attack surface
Less maintenance
The repository is now a little smaller, a little simpler, and a little more boring. In infrastructure work, boring is usually a compliment.
Sometimes the best improvement isn’t adding something new. It’s deleting something you no longer need.
So here’s to unnecessary dependencies: May they rest in peace.
And to Node.js:
🎉 Thank you for your service. Please don’t let the door hit you on the way out. 🎉
Dependency updates are one of those areas where AI is often presented as an obvious win. But when you look closely, the value proposition can be surprisingly thin.
Every few months I find myself looking at a piece of automation I wrote and asking a dangerous question:
“If I deleted this today, would I miss it?”
Recently that question came up while looking at some code that uses AI to assist with commit messages for automatic dependency updates.
It’s undeniably cool. And if we’re being honest, “cool” has probably justified more engineering decisions than we’d like to admit. ✨ Somewhere, a developer is about to spend three days adding AI to a workflow that already takes five seconds, and nobody is stopping them.
When a bot updates a dependency, AI can inspect the diff, generate a polished commit message, summarize release notes, estimate risk, and even draft a pull request description. Give it another six months and it’ll probably offer unsolicited opinions about my coding style, too. Beep-boop-beep-beep. 🤖
But do I actually need any of that? For dependency updates specifically, I’m not convinced.
The Diff Already Explains Everything
Most dependency update pull requests are boring. That’s not a criticism. Boring is good. In fact, “boring” is one of my favorite qualities in infrastructure. Right up there with “predictable”, “consistent”, and “unlikely to trigger a sensory response.” 😌
A typical update looks like this:
- Newtonsoft.Json 13.0.2
+ Newtonsoft.Json 13.0.3
Or:
- actions/checkout@v3
+ actions/checkout@v4
The dependency changed. The version changed. The automated tests passed. What more needs to be said?
An AI-generated commit message such as:
Update Newtonsoft.Json from 13.0.2 to 13.0.3 to incorporate the latest improvements and fixes.
is objectively more polished than:
chore: update thing
and considerably less polished than the commit messages written by developers who own more than one ergonomic keyboard. ⌨️
But it doesn’t add information. It’s merely a longer version of the diff.
The Cost of Automating the Obvious
AI systems are not free.
Even when the direct cost is negligible, there is still operational complexity:
Prompt engineering
API keys
Rate limiting
Error handling
Monitoring
Dependency on external services
Additional maintenance burden
For a feature whose main purpose is generating text that developers may never read, that’s a surprisingly long list.
The irony is hard to ignore. I’m adding dependencies to manage dependency updates.
Once an Xzibit meme accurately describes your architecture, it’s probably time for a design review. 😅 Or at least a moment of honest self-reflection and perhaps a nice cup of tea. ☕
Most Dependency Updates Require Validation, Not Summarization
The real value in dependency management isn’t explaining what changed. It’s determining whether the change is safe.
Questions such as:
Did tests pass?
Are there breaking changes?
Did security vulnerabilities disappear?
Has runtime behavior changed?
Should this be rolled out gradually?
Those are useful questions. An automatically generated paragraph of prose is not.
If I had to choose between:
AI-generated release summaries
Better test coverage
I’d take better tests every time.
Where AI Actually Helps
To be clear, I’m not arguing that AI is useless in dependency management. There are situations where it genuinely provides value.
For example:
Large Version Jumps
Updating from:
React 17 -> React 19
is not the same as:
React 19.1.0 -> 19.1.1
That’s the difference between “let’s merge this before lunch” and “let’s spend the next three hours reading documentation for fun.” 😅
The first update may involve deprecations, migration guides, and behavioral changes spread across hundreds of pages of documentation. Having AI summarize those changes can save time.
Dependency Investigation
When a vulnerability appears in a transitive dependency, AI can help answer questions like:
Why do I have this package?
Which component pulls it in?
What are my upgrade options?
That’s actual analysis.
Pull Request Triage
In environments processing hundreds of updates per week, AI can prioritize and categorize changes:
Security-related
Major version updates
Low-risk patch releases
Updates requiring manual review
Again, this is valuable because it’s helping people make decisions.
The “Because We Can” Trap
One of the easiest mistakes in engineering is automating something because it is technically possible. AI makes this temptation even stronger.
You add a model call. The output looks impressive. Everyone nods. Nobody wants to ask whether the feature is genuinely useful. Which is ironic, because asking uncomfortable questions is usually how I ended up adding the feature in the first place. 😅
Six months later nobody reads the generated text, nobody remembers why it exists, and the system is carrying around a feature whose primary function is making demos more interesting.
That’s usually the moment when the dangerous question returns:
“What would happen if I deleted this?”
If the answer is “nothing,” deletion should be a serious option.
Simplicity Is a Feature
The software industry currently has a tendency to ask:
“How can we add AI to this?”
A more useful question is:
“What problem exists that AI uniquely solves?”
For routine dependency updates, I’m not sure there is much of a problem to solve.
A dependency bot opens a pull request.
The diff shows the change.
CI validates the result.
Humans review anything important.
That’s already a remarkably effective system.
The AI-generated commit message may be neat. It may even spark a ten-minute discussion about style, consistency, and aesthetics that is somehow completely unrelated to dependency management. But aesthetically pleasing is not the same thing as necessity.
And sometimes the best engineering decision is not building something new. Sometimes it’s deleting code and discovering that nothing got worse.
Maybe Open Source Instead of Delete?
Just because I’m questioning a feature’s place in my workflow doesn’t mean the code itself has no value.
What started as an experiment in AI-generated commit messages evolved into a working GitHub Action. It takes a diff, calls an LLM, and produces a commit message that is often more polished than what most developers would write themselves.
The question isn’t whether it works. The question is whether it solves a problem I still have. For routine dependency updates, I increasingly think the answer is “not really.”
For routine dependency updates, the diff already tells the story. The generated explanation rarely influences whether I merge a change. Most of my confidence still comes from test results, release notes, and experience with the dependency itself.
But that doesn’t mean the idea is universally useless.
Some teams maintain hundreds of repositories. Some want consistent commit messages. Some value automated summaries and release notes. Others simply enjoy experimenting with AI-assisted workflows.
So rather than keeping an optional AI component embedded in a critical workflow, I have extracted it into its own repository and made it public on GitHub:
The action remains available for anyone who finds it useful.
Future development can happen independently.
The project can stand on its own merits. Or fail gloriously on its own merits. Open source is wonderfully impartial that way. Besides, releasing a side project to the public is significantly cheaper than buying another keyboard, graphics card, or suspiciously expensive cardigan. 😅
In a way, open-sourcing it feels like a more honest outcome than quietly keeping it around forever. If the idea is genuinely useful, people will adopt it. If not, that’s valuable feedback too. I’ve spent enough time collecting niche interests to know that “a surprisingly specific audience of twelve people” can still be a community. 🌈
Sometimes publishing a project is the fastest way to discover whether you’ve built a product, a feature, or simply an interesting experiment.
Not because I’m convinced AI-generated commit messages are essential, but because software doesn’t have to be essential to be useful. Sometimes an experiment is worth sharing even after you’ve decided not to keep it in production.
Worst case, it becomes a small open-source artifact of a particular moment in the industry’s AI enthusiasm.
Best case, somebody finds a use for it that I never did.
A Note on How This Post Was Written
Some honest truth: was this blog post (co-)written by AI?
Yes.
I gave Copilot (don’t shoot me! I also use other Large Language Models) an abstract, a rough outline of the argument I wanted to make, and the source code of the GitHub Action discussed in this article. It generated an initial draft. Which, to be fair, is also how I approach many hobbies: start with an overwhelming amount of information and then spend hours reorganizing it until it feels right. 😅
After that, though, the process looked a lot like editing any other piece of writing. I rewrote sections, changed wording, moved paragraphs around, added examples, removed points that didn’t fit, and generally shaped the article into something that reflects my own opinion. In other words, the AI produced a draft and I spent the rest of the time refining presentation details until they felt correct. If that process sounds familiar, no further questions. ✨
I can’t escape the irony of using AI to help write a blog post that questions whether AI is needed for a particular problem.
That irony is intentional. In fact, it reinforces the point I’m trying to make.
The problem was never “AI bad” versus “AI good”. The question is whether AI adds enough value to justify its complexity. For writing, brainstorming, editing, and turning rough ideas into a first draft, I often find that it does. For generating commit messages for routine dependency updates, I’m much less convinced.
AI helped me write this post faster. I’m not sure it helped me review dependency updates any better.
And that distinction is precisely why this blog post exists.
As a solo developer, I wear all the hats. 🎩👷♂️🎨 That includes the very boring Quality Assurance Hat™ — the one that says “yes, Amedee, you do need to check for trailing whitespace again.”
And honestly? I suck at remembering those little details. I’d rather be building cool stuff than remembering to run Black or fix a missing newline. So I let my robot friend handle it.
That friend is called pre-commit. And it’s the best personal assistant I never hired. 🤖
🧐 What is this thing?
Pre-commit is like a bouncer for your Git repo. Before your code gets into the club (your repo), it gets checked at the door:
“Whoa there — trailing whitespace? Not tonight.” “Missing a newline at the end? Try again.” “That YAML looks sketchy, pal.” “You really just tried to commit a 200MB video file? What is this, Dropbox?” “Leaking AWS keys now, are we? Security says nope.” “Commit message says ‘fix’? That’s not a message, that’s a shrug.”
Pre-commit runs a bunch of little scripts called hooks to catch this stuff. You choose which ones to use — it’s modular, like Lego for grown-up devs. 🧱
When I commit, the hooks run. If they don’t like what they see, the commit gets bounced. No exceptions. No drama. Just “fix it and try again.”
Is it annoying? Yeah, sometimes. But has it saved my butt from pushing broken or embarrassing code? Way too many times.
🎯 Why I bother (as a hobby dev)
I don’t have teammates yelling at me in code reviews. I am the teammate. And future-me is very forgetful. 🧓
Pre-commit helps me:
📏 Keep my code consistent
💣 It catches dumb mistakes before I make them permanent.
🕒 Spend less time cleaning up
💼 Feel a little more “pro” even when I’m hacking on toy projects
🧬 It works with any language. Even Bash, if you’re that kind of person.
Also, it feels kinda magical when it auto-fixes stuff and the commit just… works.
🛠 Installing it with pipx (because I’m not a barbarian)
I’m not a fan of polluting my Python environment, so I use pipx to keep things tidy. It installs CLI tools globally, but keeps them isolated. If you don’t have pipx yet:
Boom. It’s installed system-wide without polluting your precious virtualenvs. Chef’s kiss. 👨🍳💋
📝 Setting it up
Inside my project (usually some weird half-finished script I’ll obsess over for 3 days and then forget for 3 months), I create a file called .pre-commit-config.yaml.
You’re not just tossing some YAML in your repo and calling it a day. This thing pulls together a full-on code hygiene crew — the kind that shows up uninvited, scrubs your mess, locks up your secrets, and judges your commit messages like it’s their job. Because it is.
📦 pre-commit-hooks (v5.0.0)
These are the basics — the unglamorous chores that keep your repo from turning into a dumpster fire. Think lint roller, vacuum, and passive-aggressive IKEA manual rolled into one.
trailing-whitespace: 🚫 No more forgotten spaces at the end of lines. The silent killers of clean diffs.
end-of-file-fixer: 👨⚕️ Adds a newline at the end of each file. Why? Because some tools (and nerds) get cranky if it’s missing.
check-yaml: 🧪 Validates your YAML syntax. No more “why isn’t my config working?” only to discover you had an extra space somewhere.
check-added-large-files: 🚨 Stops you from accidentally committing that 500MB cat video or .sqlite dump. Saves your repo. Saves your dignity.
🔐 gitleaks (v8.28.0)
Scans your code for secrets — API keys, passwords, tokens you really shouldn’t be committing. Because we’ve all accidentally pushed our .env file at some point. (Don’t lie.)
✍️ gitlint (v0.19.1)
Enforces good commit message style — like limiting subject line length, capitalizing properly, and avoiding messages like “asdf”. Great if you’re trying to look like a serious dev, even when you’re mostly committing bugfixes at 2AM.
🔁 pre-commit-update (v0.8.0)
The responsible adult in the room. Automatically bumps your hook versions to the latest stable ones. No more living on ancient plugin versions.
🧼 In summary
This setup covers:
✅ Basic file hygiene (whitespace, newlines, YAML, large files)
🔒 Secret detection
✉️ Commit message quality
🆙 Keeping your hooks fresh
You can add more later, like linters specific for your language of choice — think of this as your “minimum viable cleanliness.”
🧩 What else can it do?
There are hundreds of hooks. Some I’ve used, some I’ve just admired from afar:
black is a Python code formatter that says: “Shhh, I know better.”
flake8 finds bugs, smells, and style issues in Python.
Now every time you commit, your code gets a spa treatment before it enters version control. 💅
Wanna retroactively clean up the whole repo? Go ahead:
pre-commit run --all-files
You’ll feel better. I promise.
🎯 TL;DR
Pre-commit is a must-have. It’s like brushing your teeth before a date: it’s fast, polite, and avoids awkward moments later. 🪥💋 If you haven’t tried it yet: do it. Your future self (and your Git history, and your date) will thank you. 🙏
Use pipx to install it globally. Add a .pre-commit-config.yaml. Install the Git hook. Enjoy cleaner commits, fewer review comments — and a commit history you’re not embarrassed to bring home to your parents. 😌💍
And if it ever annoys you too much? You can always disable it… like cancelling the date but still showing up in their Instagram story. 😈💔
git commit --no-verify
Want help writing your first config? Or customizing it for Python, Bash, JavaScript, Kotlin, or your one-man-band side project? I’ve been there. Ask away!
There comes a time in every developer’s life when you just know a certain commit existed. You remember its hash: deadbeef1234. You remember what it did. You know it was important. And yet, when you go looking for it…
💥 fatal: unable to read tree <deadbeef1234>
Great. Git has ghosted you.
That was me today. All I had was a lonely commit hash. The branch that once pointed to it? Deleted. The local clone that once had it? Gone in a heroic but ill-fated attempt to save disk space. And GitHub? Pretending like it never happened. Typical.
🪦 Act I: The Naïve Clone
“Let’s just clone the repo and check out the commit,” I thought. Spoiler alert: that’s not how Git works.
Thanks Git. Very cool. Apparently, if no ref points to a commit, GitHub doesn’t hand it out with the rest of the toys. It’s like showing up to a party and being told your friend never existed.
🧪 Act II: The Desperate fsck
Surely it’s still in there somewhere? Let’s dig through the guts.
git fsck --full --unreachable
Nope. Nothing but the digital equivalent of lint and old bubblegum wrappers.
🕵️ Act III: The Final Trick
Then I stumbled across a lesser-known Git dark art:
git fetch origin deadbeef1234
And lo and behold, GitHub replied with a shrug and handed it over like, “Oh, that commit? Why didn’t you just say so?”
Suddenly the commit was in my local repo, fresh as ever, ready to be inspected, praised, and perhaps even resurrected into a new branch:
git checkout -b zombie-branch deadbeef1234
Mission accomplished. The dead walk again.
☠️ Moral of the Story
If you’re ever trying to recover a commit from a deleted branch on GitHub:
Cloning alone won’t save you.
git fetch origin <commit> is your secret weapon.
If GitHub has completely deleted the commit from its history, you’re out of luck unless:
You have an old local clone
Someone forked the repo and kept it
CI logs or PR diffs include your precious bits
Otherwise, it’s digital dust.
🧛 Bonus Tip
Once you’ve resurrected that commit, create a branch immediately. Unreferenced commits are Git’s version of vampires: they disappear without a trace when left in the shadows.
git checkout -b safe-now deadbeef1234
And there you have it. One undead commit, safely reanimated.
Managing multiple servers can be a daunting task, especially when striving for consistency and efficiency. To tackle this challenge, I developed a robust automation system using Ansible, GitHub Actions, and Vagrant. This setup not only streamlines server configuration but also ensures that deployments are repeatable and maintainable.
A Bit of History: How It All Started
This project began out of necessity. I was maintaining a handful of Ubuntu servers — one for email, another for a website, and a few for experiments — and I quickly realized that logging into each one to make manual changes was both tedious and error-prone. My first step toward automation was a collection of shell scripts. They worked, but as the infrastructure grew, they became hard to manage and lacked the modularity I needed.
That is when I discovered Ansible. I created the ansible-servers repository in early 2024 as a way to centralize and standardize my infrastructure automation. Initially, it only contained a basic playbook for setting up users and updating packages. But over time, it evolved to include multiple roles, structured inventories, and eventually CI/CD integration through GitHub Actions.
Every addition was born out of a real-world need. When I got tired of testing changes manually, I added Vagrant to simulate my environments locally. When I wanted to be sure my configurations stayed consistent after every push, I integrated GitHub Actions to automate deployments. When I noticed the repo growing, I introduced linting and security checks to maintain quality.
The repository has grown steadily and organically, each commit reflecting a small lesson learned or a new challenge overcome.
The Foundation: Ansible Playbooks
At the core of my automation strategy are Ansible playbooks, which define the desired state of my servers. These playbooks handle tasks such as installing necessary packages, configuring services, and setting up user accounts. By codifying these configurations, I can apply them consistently across different environments.
To manage these playbooks, I maintain a structured repository that includes:
Inventory Files: Located in the inventory directory, these YAML files specify the hosts and groups for deployment targets.
Roles: Under the roles directory, I define reusable components that encapsulate specific functionalities, such as setting up a web server or configuring a database.
Configuration File: The ansible.cfg file sets important defaults, like enabling fact caching and specifying the inventory path, to optimize Ansible’s behavior.
Seamless Deployments with GitHub Actions
To automate the deployment process, I leverage GitHub Actions. This integration allows me to trigger Ansible playbooks automatically upon code changes, ensuring that my servers are always up-to-date with the latest configurations.
One of the key workflows is Deploy to Production, which executes the main playbook against the production inventory. This workflow is defined in the ansible-deploy.yml file and is triggered on specific events, such as pushes to the main branch.
Additionally, I have set up other workflows to maintain code quality and security:
Super-Linter: Automatically checks the codebase for syntax errors and adherence to best practices.
Dependabot Updates: Keeps dependencies up-to-date by automatically creating pull requests for new versions.
Local Testing with Vagrant
Before deploying changes to production, it is crucial to test them in a controlled environment. For this purpose, I use Vagrant to spin up virtual machines that mirror my production servers.
This approach allows me to validate changes in a safe environment before applying them to live servers.
Embracing Open Source and Continuous Improvement
Transparency and collaboration are vital in the open-source community. By hosting my automation setup on GitHub, I invite others to review, suggest improvements, and adapt the configurations for their own use cases.
The repository is licensed under the MIT License, encouraging reuse and modification. Moreover, I actively monitor issues and welcome contributions to enhance the system further.
In summary, by combining Ansible, GitHub Actions, and Vagrant, I have created a powerful and flexible automation framework for managing my servers. This setup not only reduces manual effort but also increases reliability and scalability. I encourage others to explore this approach and adapt it to their own infrastructure needs. What began as a few basic scripts has now evolved into a reliable automation pipeline I rely on every day.
If you are managing servers and find yourself repeating the same configuration steps, I invite you to check out the ansible-servers repository on GitHub. Clone it, explore the structure, try it in your own environment — and if you have ideas or improvements, feel free to open a pull request or start a discussion. Automation has made a huge difference for me, and I hope it can do the same for you.
When you first encounter Gitmoji, it might feel like a whimsical idea — adding emojis to your Git commit messages? Surely that is just a fun way to decorate your history, right?
Well… yes. But also, no. Gitmojis are much more than just cute little icons. They are a powerful convention that improves collaboration, commit clarity, and even automation in your development workflow. In this post, we will explore how Gitmojis can boost your Git hygiene, help your team, and make your commits more expressive — without writing a novel in every message.
What is Gitmoji?
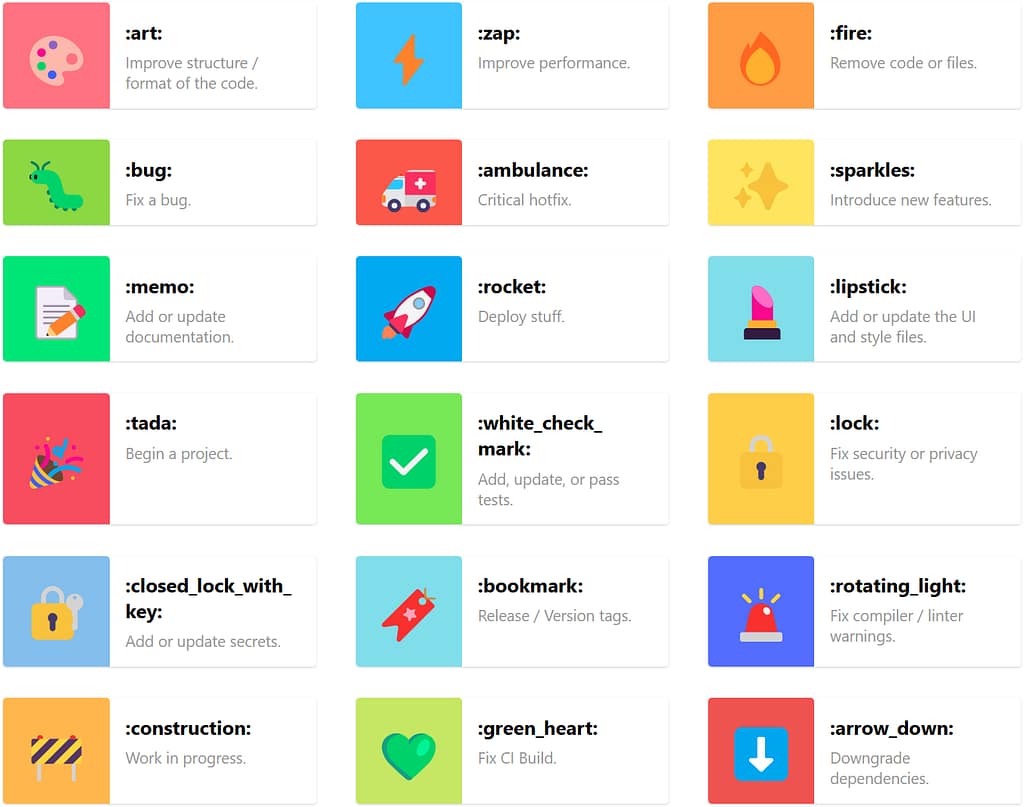
Gitmoji is a project by Carlos Cuesta that introduces a standardized set of emojis to prefix your Git commit messages. Each emoji represents a common type of change. For example:
Emoji
Code
Description
✨
:sparkles:
New feature
🐛
:bug:
Bug fix
📝
:memo:
Documentation change
♻️
:recycle:
Code refactor
🚀
:rocket:
Performance upgrade
Why Use Gitmoji?
1. Readable History at a Glance
Reading a log full of generic messages like fix stuff, more changes, or final update is painful. Gitmojis help you scan through history and immediately understand what types of changes were made. Think of it as color-coding your past.
🧱 Example — Traditional Git log:
git log --oneline
b11d9b3 Fix things
a31cbf1 Final touches
7c991e8 Update again
🔎 Example — Gitmoji-enhanced log:
🐛 Fix overflow issue on mobile nav
✨ Add user onboarding wizard
📝 Update README with environment setup
🔥 Remove unused CSS classes
2. Consistency Without Bureaucracy
Git commit conventions like Conventional Commits are excellent for automation but can be intimidating and verbose. Gitmoji offers a simpler, friendlier alternative — a consistent prefix without strict formatting.
You still write meaningful commit messages, but now with context that is easy to scan.
3. Tooling Support with gitmoji-cli
Gitmoji CLI is a command-line tool that makes committing with emojis seamless.
🛠 Installation:
npm install -g gitmoji-cli
🧪 Usage:
gitmoji -c
You will be greeted with an interactive prompt:
✔ Gitmojis fetched successfully, these are the new emojis:
? Choose a gitmoji: (Use arrow keys or type to search)
❯ 🎨  - Improve structure / format of the code.
  ⚡️  - Improve performance.
  🔥  - Remove code or files.
  🐛  - Fix a bug.
  🚑️  - Critical hotfix.
  ✨  - Introduce new features.
  📝  - Add or update documentation.
(Move up and down to reveal more choices)
The CLI also supports conventional formatting and custom scopes. Want to tweak your settings?
gitmoji --config
You can also use it in CI/CD pipelines or with Git hooks to enforce Gitmoji usage across teams.
4. Better Collaboration and Code Review
Your teammates will thank you when your commits say more than “fix” or “update”. Gitmojis provide context and clarity — especially during code review or when you are scanning a pull request with dozens of commits.
🧠 Before:
fix
update styles
final commit
✅ After:
🐛 Fix background image issue on Safari
💄 Adjust padding for login form
✅ Add final e2e test for login flow
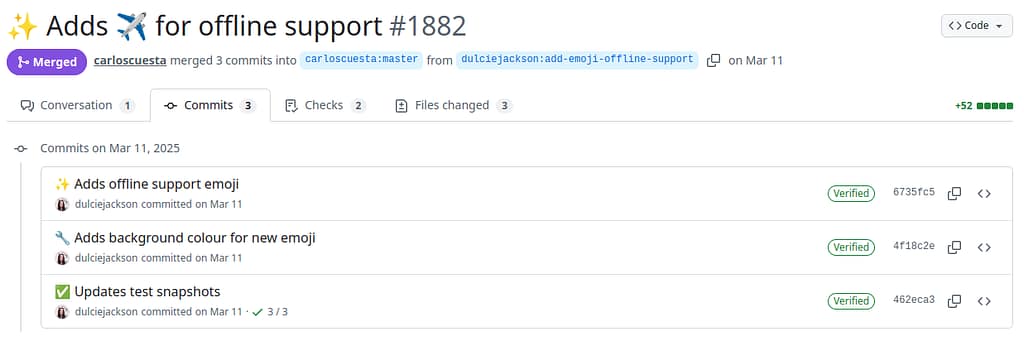
This is how a pull request with Gitmoji commits looks like on GitHub:
5. Automation Ready
Need to generate changelogs or trigger actions based on commit types? Gitmoji messages are easy to parse, making them automation-friendly.
Example with a simple script:
git log --oneline | grep "^✨"
You can even integrate this into release workflows with tools like semantic-release or your own custom tooling.
Do Not Let the Cute Icons Fool You
Yes, emojis are fun. But behind the smiling faces and sparkles is a thoughtful system that improves your Git workflow. Whether you are working solo or as part of a team, Gitmoji brings:
✅ More readable commit history
✅ Lightweight commit standards
✅ Easy automation hooks
✅ A dash of joy to your development day
So next time you commit, try it:
gitmoji -c
Because Gitmojis are not just cute. They are practical, powerful — and yes, still pretty adorable.