Resurrecting My Windows Partition After 4 Years 🖥️🎮
Sometimes Linux life is bliss. I have my terminal, my editor, my tools, and Steam games that run natively. For nearly four years, I didn’t touch Windows once — and I didn’t miss it.
And then Fortnite happened.
My girlfriend Enya and her wife Kyra got hooked, and naturally I wanted to join them. But Fortnite refuses to run on Linux — apparently some copy-protection magic that digs into the Windows kernel, according to Reddit (so I don’t know if it’s true). It’s rare these days for a game to be Windows-only, but rare enough to shatter my Linux-only bubble. Suddenly, resurrecting Windows wasn’t a chore anymore; it was a quest for polyamorous Battle Royale glory. 🕹️
My Windows 11 partition had been hibernating since November 2021, quietly gathering dust and updates in a forgotten corner of the disk. Why it stopped working back then? I honestly don’t remember, but apparently I had blogged about it. I hadn’t cared — until now.
The Awakening – Peeking Into the UEFI Abyss 🐧
I started my journey with my usual tools: efibootmgr and update-grub on Ubuntu. I wanted to see what the firmware thought was bootable:
sudo efibootmgr
Output:
BootCurrent: 0001
Timeout: 1 seconds
BootOrder: 0001,0000
Boot0000* Windows Boot Manager ...
Boot0001* Ubuntu ...
At first glance, everything seemed fine. Ubuntu booted as usual. Windows… did not. It didn’t even show up in the GRUB boot menu. A little disappointing—but not unexpected, given that it hadn’t been touched in years. 😬
I knew the firmware knew about Windows—but the OS itself refused to wake up.
The Hidden Enemy – Why os-prober Was Disabled ⚙️
I soon learned that recent Ubuntu versions disable os-prober by default. This is partly to speed up boot and partly to avoid probing unknown partitions automatically, which could theoretically be a security risk.
I re-enabled it in /etc/default/grub:
GRUB_DISABLE_OS_PROBER=false
Then ran:
sudo update-grub
Even after this tweak, Windows still didn’t appear in the GRUB menu.
The Manual Attempt – GRUB to the Rescue ✍️
Determined, I added a manual GRUB entry in /etc/grub.d/40_custom:
menuentry "Windows" {
    insmod part_gpt
    insmod fat
    insmod chain
    search --no-floppy --fs-uuid --set=root 99C1-B96E
    chainloader /EFI/Microsoft/Boot/bootmgfw.efi
}
How I found the EFI partition UUID:
sudo blkid | grep EFIResult:
UUID="99C1-B96E"
Ran sudo update-grub… Windows showed up in GRUB! But clicking it? Nothing.
At this stage, Windows still wouldn’t boot. The ghost remained untouchable.
The Missing File – Hunt for bootmgfw.efi 🗂️
The culprit? bootmgfw.efi itself was gone. My chainloader had nothing to point to.
I mounted the NTFS Windows partition (at /home/amedee/windows) and searched for the missing EFI file:
sudo find /home/amedee/windows/ -type f -name "bootmgfw.efi"
/home/amedee/windows/Windows/Boot/EFI/bootmgfw.efi
The EFI file was hidden away, but thankfully intact. I copied it into the proper EFI directory:
sudo cp /home/amedee/windows/Windows/Boot/EFI/bootmgfw.efi /boot/efi/EFI/Microsoft/Boot/
After a final sudo update-grub, Windows appeared automatically in the GRUB menu. Finally, clicking the entry actually booted Windows. Victory! 🥳
Four Years of Sleeping Giants 🕰️
Booting Windows after four years was like opening a time capsule. I was greeted with thousands of updates, drivers, software installations, and of course, the installation of Fortnite itself. It took hours, but it was worth it. The old system came back to life.
Every “update complete” message was a heartbeat closer to joining Enya and Kyra in the Battle Royale.
The GRUB Disappearance – Enter Ventoy 🔧
After celebrating Windows resurrection, I rebooted… and panic struck.
The GRUB menu had vanished. My system booted straight into Windows, leaving me without access to Linux. How could I escape?
I grabbed my trusty Ventoy USB stick (the same one I had used for performance tests months ago) and booted it in UEFI mode. Once in the live environment, I inspected the boot entries:
sudo efibootmgr -v
Output:
BootCurrent: 0002
Timeout: 1 seconds
BootOrder: 0002,0000,0001
Boot0000* Windows Boot Manager ...
Boot0001* Ubuntu ...
Boot0002* USB Ventoy ...
To restore Ubuntu to the top of the boot order:
sudo efibootmgr -o 0001,0000
Console output:
BootOrder changed from 0002,0000,0001 to 0001,0000
After rebooting, the GRUB menu reappeared, listing both Ubuntu and Windows. I could finally choose my OS again without further fiddling. 💪
A Word on Secure Boot and Signed Kernels 🔐
Since we’re talking bootloaders: Secure Boot only allows EFI binaries signed with a trusted key to execute. Ubuntu Desktop ships with signed kernels and a signed shim so it boots fine out of the box. If you build your own kernel or use unsigned modules, you’ll either need to sign them yourself or disable Secure Boot in firmware.
Diagram of the Boot Flow 🖼️
Here’s a visual representation of the boot process after the fix:
flowchart TD
    UEFI["⚙️ UEFI Firmware BootOrder:<br/>0001 (Ubuntu) →<br/>0000 (Windows)<br/>(BootCurrent: 0001)"]

    subgraph UbuntuEFI["shimx64.efi"]
        GRUB["📂 GRUB menu"]
        LINUX["🐧 Ubuntu Linux<br/>kernel + initrd"]
        CHAINLOAD["🪟 Windows<br/>bootmgfw.efi"]
    end

    subgraph WindowsEFI["bootmgfw.efi"]
        WBM["🪟 Windows Boot Manager"]
        WINOS["💻 Windows 11<br/>(C:)"]
    end

    UEFI --> UbuntuEFI
    GRUB -->|boots| LINUX
    GRUB -.->|chainloads| CHAINLOAD
    UEFI --> WindowsEFI
    WBM -->|boots| WINOS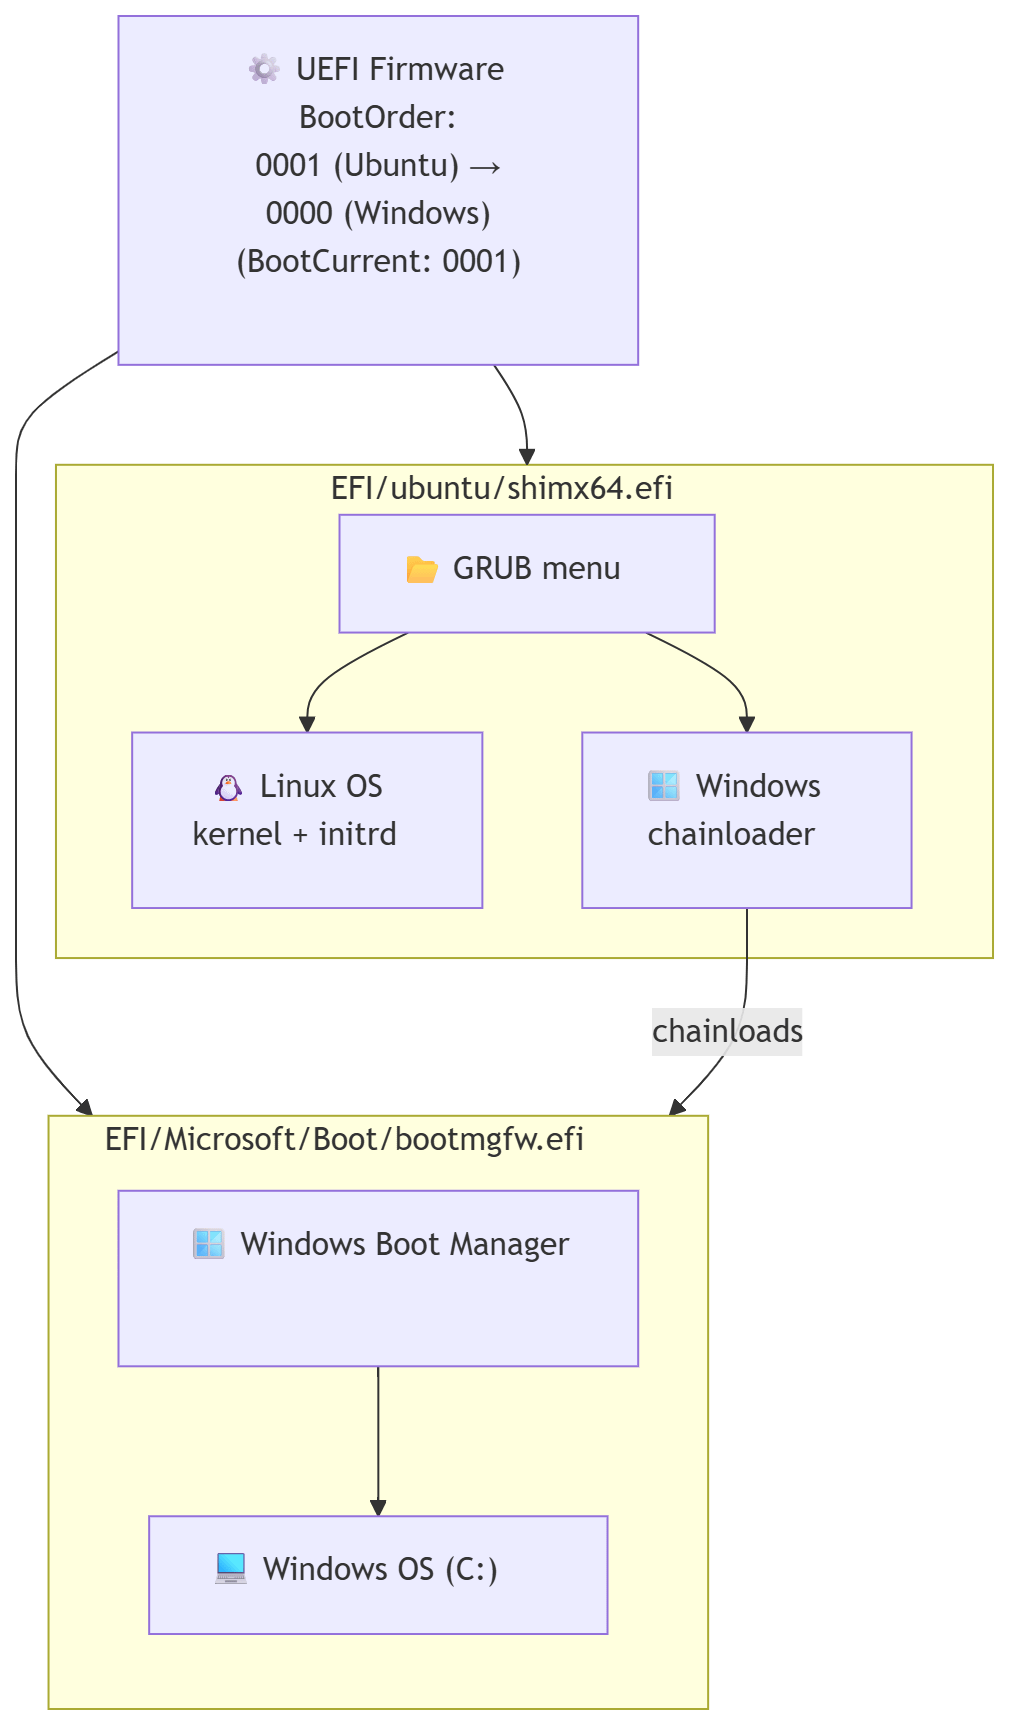
From the GRUB menu, the Windows entry chainloads bootmgfw.efi, which then points to the Windows Boot Manager, finally booting Windows itself.
First Battle Royale 🎮✨
After all the technical drama and late-night troubleshooting, I finally joined Enya and Kyra in Fortnite.
I had never played Fortnite before, but my FPS experience (Borderlands hype, anyone?) and PUBG knowledge from Viva La Dirt League on YouTube gave me a fighting chance.
We won our first Battle Royale together! 🏆💥 The sense of triumph was surreal—after resurrecting a four-year-old Windows partition, surviving driver hell, and finally joining the game, victory felt glorious.
TL;DR: Quick Repair Steps ⚡
- Enable os-prober in
/etc/default/grub. - If Windows isn’t detected, try a manual GRUB entry.
- If boot fails, copy
bootmgfw.efifrom the NTFS Windows partition to/boot/efi/EFI/Microsoft/Boot/. - Run
sudo update-grub. - If GRUB disappears after booting Windows, boot a Live USB (UEFI mode) and adjust
efibootmgrto set Ubuntu first. - Reboot and enjoy both OSes. 🎉
This little adventure taught me more about GRUB, UEFI, and EFI files than I ever wanted to know, but it was worth it. Most importantly, I got to join my polycule in a Fortnite victory and prove that even a four-year-old Windows partition can rise again! 💖🎮